Wargaming Tradecraft: supplies


Donate

Clear Bases


I wanted to showcase some miniatures for Gloomhaven that I painted as a commission. The goal was to replicate the character art and I'm pretty happy with how everything turned out.

I'd like to also touch on clear bases. It's not something you see very often and if I'm honest, NOT something you SHOULD see very often. I suppose that's a weird way to start out a tutorial - "Look how cool this is, but don't do it." It's because clear bases impact recommendations I usually make when it comes to how you build your miniatures.

For one, which I'll talk about more below, is that I usually recommend your miniature's feet interact with their base.

The other is the composition of the figure. A miniature isn't just the mini, the base is part of it. I recommend either something the compliments the figure and makes a nice looking scene, something that contrasts the mini by making the miniature stand out in comparison, or something that's muted and simple like a photo backdrop which pushes the miniature to the foreground.

The risk of a clear base is that you don't have control over what's below it. For wargaming, this is pretty random and could be any ugly tabletop. In tile-based games like Gloomhaven and all sorts of other stuff out these days, it can create a pretty cool aesthetic. In the final photo, it looks like the group is standing together in a stone-floored setting.


Realistically Wrapped Weapon Grips

I've used string before on bows, though that's a much more subtle use than you're going to see today. The idea here is to wrap an entire weapon grip such as a long axe shaft in this case, though you could easily apply it to sword hilts, terrain columns, large battlefield weapons like catapults and more. If you read my terrain tutorials, you'll see I often work with real supplies because I feel it adds an element of realism and credibility to your art which brings our miniatures to life.

What I'm trying to change is the basic sculpted leather wraps. As you can see in the photo here, there's a difference.


Black 2.0 - Worth the Hype?

I've seen a lot of questions about the validity of Black 2.0, supposedly "The world’s mattest, flattest, black art material" (According to their website.) and decided to order a bottle and find out the answer myself since most articles about this product are just re-using the same imagery from the company behind it.

update: I'm tagging this post with Black 3.0 as well because people should have a legitimate review of the product. Other reviews of Black 3.0 are just using Kickstarter marketing materials. My concern with what Black 3.0 will actually be like is based on their 2.0 marketing images (as you can see below) and what the product actually looked like when I tested it. Decide for yourself, but this is another instance of why I won't post reviews based on marketing images.

Vantablack

Before getting into the review, a quick look at the baseline of what we're aiming for. Basically, a company called Surrey NanoSystems developed a paint called Vantablack which absorbs 99.96% of light that hits it. Without light reflecting from objects, all you see is a black blob without any detail no matter what angle you're looking at it.

Vantablack
Unfortunately, an artist named Anish Kapoor bought exclusive rights to this paint, which means we're not going to get access to this stuff any time soon.

What I'm going to look at here is a paint that bills itself as the next best thing.

Building Display Boards


My Midnight Court project was the first I've created a display board for, so I thought I'd walk through how I built it. Most of this is planning, cutting and gluing but I'll touch on a few unique supplies and techniques as well.

If you'd like to see some details on how I created the black water with a mirrored sub-surface, take a look through this tutorial.


Painting Glowing Eyes


 When painting my Ghoul Army, I decided to add a splash of colour to what was going to be strictly black and white. This ended up being a good decision to get a little contrast on the field.

I used this as an opportunity to write up a little tutorial on creating glows and to try out a new supply from Games Workshop, which I'll talk about too.

Bracing Bows (Attaching string to miniature bows)


There are plenty of fantasy miniatures that have bows and crossbows, but they never have the bow string because it would be too fine to mold. Most of the time, we leave this detail off, but there's really no reason to.

The following is a short, simple article meant to inspire with a couple tips to make it look the best.

Fun fact: The act of stringing a bow is called "bracing."

Non-Traditional Primer for an Age of Sigmar Knight


 I actually painted this miniature back at the end of last year and apparently missed sharing it on my website. (Though you could have seen it on Facebook.) When Kitchener finally got a Warhammer store, we also got an awesome manager who's rekindled the region's Games Workshop presence. As a welcome, I painted a show piece from their Age of Sigmar box set with my usual style. Reallllllllly impressed with myself as to how it turned out.

Don't really have any WIPs but at the end of the article I want to touch on how to work with non-traditional primer.

Janissa Tauren [Final WIP and Photos]

This is one I've been working on for a while and you've seen the progress if you've been following on Facebook.

The hair I'm particularly fond of, but a lot of things have brought the whole model together.

As I've said before, when I went into detail on how I painted her hair, she's come to be fondly referred to as "Maybelline". Some think her hair looks like a cloak, but I tell them "Maybe it's Maybelline." Love it.

Also, curious how I sculpted her? Take a look at the beginning process and how I bulked up some of my other Tauren minis. A process I think I've gotten better at as I built the heads and then the shoulders of my Warders.

Day-Glo Pigments


I've discussed using pigments before and since then have used them quite a bit. Here's another type of pigment - Day-Glow. (Or Day-Glo.) The reason I prefer to use the term "Pigment" and not "Weathering Powder" is because these have more uses besides weathering.

In this article I'm going to compare using day-glo pigments to paint and briefly touch on why you can't replicate this look with normal paint.

I bought these ones from Forged Monkey (Massive Voodoo) but they seem to have changed around their store since then and don't appear to be selling it anymore.

Finally, we'll look at how these react under UV / Black Lights


Happy Seppuku Terrain Stamps Kickstarter 2


Terrain stamps allow you to create detailed bases and scenery at a fraction of the cost of buying resin bases.

I interviewed Stephen from Happy Seppuku Model Works a few days ago as a precursor to reviewing their newest Kickstarter - The Stampede! I reviewed their first Kickstarter a few years back while also looking at the uses of terrain stamps and was glad to have the opportunity to take a look at their newest offerings.

You can see a couple examples below. The base on the right was painted by a friend of mine while painting his first miniature. Ever. It demonstrates how you can sculpt additional details into stamped stuff and how easy stamping is as this was the first time he's done any work with putty.


It's that easy.

Apologies for this being last minute. Happy Seppuku sent me a sampling of some of their stamps to review, but customs decided to sit on it for a little while. I've stayed up late to write this for you because this is the last day for the Kickstarter. It ends Tomorrow at 3am EST / Tonight at midnight PST. If you do happen to miss it, their store will likely see the newer stamps added in the near future.

Just click on through to read a review of their newest stamps, including a comparison to what they created previously.

Creating the Mountain King's River

In the last post on my Elemental King, I discussed building the Mountain King's base. Today, you can read a comprehensive tutorial on how I created the water on his base. I'll admit: I'm pretty proud of this one. It turned out beautifully and the ripples I made in the water seem spot on.

Included are some money saving tips and details on a slight hiccup, which you'll have to read the post to find out about.

Mountain King's Chipped Pearl Mani-Pedi


Another change I decided to make to the Mountain King was to replace all his finger and toe nails with real chipped pearl.

The other thing I'll show off here is using a Dremel to make the process easier.

You can see an example here of how it looks when I finished.

I had considered replacing his teeth with stones, but that was looking a little logistically crazy and to be honest, I liked how his teeth looked. While rooting through my terrain bits I came across the pearl chips and it all came together.

You can also carve the nails out with a knife, but a rotary tool is just tons easier and faster.

Stripping Paint Safely - A Detailed Look

Whether you're planning on painting models you picked up used or decided to restart something you're already working on, sometimes you need to remove paint from miniatures.

I'm going to show you some ways to safely break down a miniature and strip the paint from it. I'll also demonstrate how to remove paint from a single point on the figure.

Before getting to it though, I'll cover a number of safety concerns regarding some of the often recommended paint strippers out there. I've discussed the safety concerns with people before, many who blow them off as being unfounded. The main point I want to get across is: When environmentally friendly products like Simple Green exist and do such a fantastic job of stripping paint, it's irresponsible to recommend potentially harmful chemicals.

There are a couple things I'd be curious to get feedback on:
a) Were you aware of the safety concerns outlined in this post? (From a paint stripper or nail polish perspective.)
b) If you weren't already using an environmentally friendly paint stripper, will this change your mind?

Also, I've seen discussions defending the use of chemicals get pretty toxic, so please keep comments civil.

Building an Airbrush Cleaning Station

Last week, I added Airbrush Paints to my long list of Airbrush Articles. This week I'm going to show you how to make your own airbrush cleaning station. What is it you ask? This allows you to spray out your airbrush at full strength without making a mess. Use it when gently cleaning between paints or for running a ton of water and airbrush cleaner through for a full clean.

If you're not much of a do-it-yourselfer, you can always find them online for about $30 or so, which isn't much, but what I'm going to show you will cost A LOT less. Something that some store-bought cleaning stations will include are filters to do a better job of handling the extra air that escapes but this tends to work just fine.

All it takes is some kind of small jar and a little bit of green stuff - practically free!

Airbrush Paint - Why and Why Not

Createx is just the brand I happened to try, probably others.
I've discussed Airbrushes at length in the past, but up until recently I've always thinned and mixed airbrush paints myself.

Recently I finally tried out actual airbrush paints and it was absolutely worth it. For my wife's Crystalline Affliction army, heavy on the beasts, I wanted consistency in how the colours looked rather than mixing every time.

Not having to thin paints for my airbrush was AWESOME. I've added a small selection of paints to my list of Wargaming Approved Supplies.

Get Yourself a Notebook

[Originally posted October 28th, 2011]

This is a very handy tool when you're painting armies... I don't know about you, but remembering how I painted something 6 months ago (sometimes even a week) can be tricky. So get a notebook and keep simple notes about how you paint something if you expect to have to paint it again at some point. (Or even if you don't)

I usually don't bother with this when I'm painting single models - BUT, armies look really nice when they're painted with a uniform colour scheme. Some variances are okay, but generally, you'll want them to be similar. Those similarities are what you should keep track of.

For example, I have notes for every version of the Eldar Alaitoc armour I've painted, and their accessories. (For reference, there've been 3 - heavy armour w/ chainmail, a newer style similar to aspect armour, and the newest sleeker style.)

Crackle Medium and Hordebloods Troll Rune Mage


 Crackle Medium is a nifty supply because it creates some really cool textures and effects just by letting it dry. There are multiple brands and they all work a little differently, so you should definitely read the instructions and test before using it on a real project.

I've previously looked at a crackle medium that does thinner or a more subtle look.

Essentially, crackle medium is a gel or paint that dries in such a way that you're left with a "cracked" texture or pattern. This is great for creating lightning and other special effects or dry desert-like surfaces.

I used crackle medium on my Troll Rune Mage, (Just posting photos now.) as well as Gul'Doomshaper and a Warlock.

[Review] Battle Foam P.A.C.K. 1520XL Custom


TheWife and her parents bought me an early Christmas present last year - a Battle Foam carrying case for my Hordebloods army. Specifically, the P.A.C.K. 1520XL Custom. It's probably about time for me to do a review on the product. (US) Thanksgiving was a great opportunity to buy the case because they put on a 20-60% sale which you can take advantage of this year too between November 28th and December 1st. It's also worth noting they have a year round sale for army vets.

I'm going to avoid reviewing the drama that has on occasion spread across Internet in regards to their business practices. Instead, I'll be focusing on just my own experience with the company.

The following is a full look at both the final product and the ordering process. Overall, I love it. Some things weren't perfect, but when it comes to protecting your army, Battle Foam nails it. This is why:

Supplies - Crystals (Amethyst)


I'm a big believer in using realistic objects to create terrain and do basing. It adds this wonderful touch of realism to your projects. Almost adds a certain level of credibility to what you're painting - making them look like they "belong" in the world.

Rare stones can add a lot of flare to a project and are easily and cheaply available. You can usually find them at hippy stores in the mall and farmers markets, but also some hobby or speciality stores. Unlike hobby jewels, crystals are less "blingy" and more natural.

Quartz crystals all look roughly similar but come in different colours and/or smokey/cloudyness, while Amethyst is the purple variety. It's not considered an expensive crystal, but buying them on eBay can add up.

Masking when Priming and Airbrushing


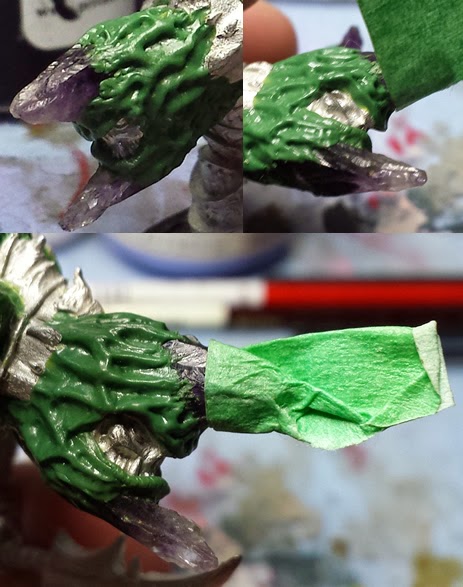
Masking is the process of taping off areas so that you don't get paint on them. For example, when painting a room, you'd run tape along the trim or the ceiling so you don't get paint all over the place and get a straight line from the tape.

When painting Thagrosh, masking became very important because I had to keep paint off of all the crystals when priming and airbrushing. I could have glued the crystals in after priming, but then the green stuff has to be sculpted in a way that allows me to remove the crystals. It wouldn't look as good.