


 If you missed it, I've also covered painting fur in the past.
These are both topics that can be pretty tricky so I hope I've helped to shed some light on them. Ask away in the comments if you have any questions.
Fun side-story. This model's become known as "Maybelline" because people feel the hair I've sculpted for her is too blocky. Looks like a cape they say. In response, I tell them, "Maybe it's Maybelline." This actually becomes relevant a little later as it helped inspire the technique I ended up using.
Base Coat

- Orange base.
- White highlight.
- Off-Orange (brownish) blend between the white highlight and orange base.
I use an off colour rather than a blend with white to add contrast.
If you don't have an airbrush, that's OK. Couple options, the first being you blend the highlights in with a brush as normal. Another is to mix some water into your paints while working to create thick washes then paint all the colours at the same time, allowing the washes to mix. (It's hair, let it blend.) Finally, you can click the link above to see how I painted the fur on my Fel Caller without an airbrush.
 Next, I lay a blended wash layer all at the same time. I gather my red, orange and brown washes, then apply them while everything wet so they mix with some unevenness.
 Red wash on the middle of the orange.
Brown wash on the middle of the white.
Orange wash on the in between.
Texturing the Hair
As I described above, I wanted to find a way to make the hair stand out as more than just a green-stuff form. For this reason, I couldn't just paint her hair the same way I painted the Fel Caller. I wanted more texture. Also, since she has so much hair, I wanted to inject my Hordeblood style into it and all the brush strokes to be visible.
In the photo below, you can see on the left that the standard way of highlighting hair is to just paint lines, highlighting the raised strands of hair.

Stroke Techniques
Instead, I've used a mixture of techniques.
- Vertical Lines (Think a dashed line instead of one long line.)
- Diagonal Lines
- Diagonal Lines from Vertical Lines
- Diagonal Lines across Vertical Lines
When you put all these smaller lines together, it creates a sense of movement, of more strands than there actually are, of the chaos of hair. Is this time consuming? You sure bet it is!

Why not just sculpt all the strands of hair? First, that would be REALLY tedious. Second, it would actually be impractical to attempt sculpting hair to the scale we work with. Primer and other paint would simply obscure detail.
More Layers
The top row of photos below show how she looks after a single layer of styled highlights using an beige paint. (Bleached Bone.) This layer, I paint over everything in the hair, which works because the beige is a nice middle ground for the highlights and shadows both.
It's not bad, but it's a little flat. That's why I'm always talking about contrast. Make your paint stand out!
In the bottom row, I've done the exact same thing but with a few specifics.
- White highlights.
- Just on the white band highlights.
- Red shades.
- The middle of the orange bands.
- All shadowed areas.
- Black shades.
- Recesses of the shadowed areas.
In each case, I'm still doing the small lines I detailed above, I'm just being more careful about where.

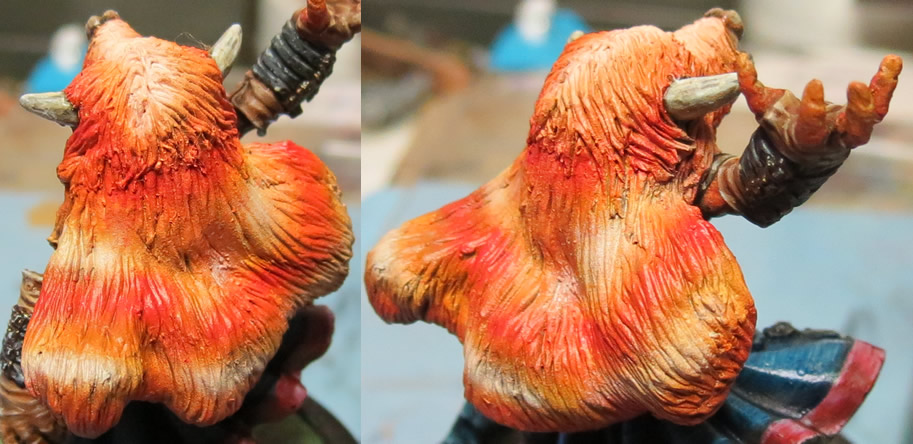
Final (WIP) Photos
Below you'll find the pictures of where Janessa stands as a painted and varnished miniature. Final steps will be adding terrain to her base and some magical effects.

No comments :
Post a Comment
Please keep all comments civil and language appropriate for a child-safe environment.