


 |
| [UPDATE] Casio was my mid-range choice Now, Canon quality is where I sit. |
This was written for a group project that Ron over at From the Warp put together - see the Collaborative Post with similar suggestions from others.
Camera
Basically all digital cameras these days are good enough to take pics of your minis, even the $50 ones.What tends to separate the good from the bad is manufacturing quality (how long the camera will last) and optical zoom. Name brand is nice, but if you're spending fifty bucks on a camera, maybe you don't care.
I suggest finding ones that use SecureDigital memory since most do - that way you can use your memory cards if you ever upgrade. Sony has their own memory card, though they do have great zoom and they are quality products. (Though you don't need zoom to take pics of your minis)
Bonus Tip: Avoid HP/Compaq like the plague in all things technical.
Quality is measured in megapixels. 2 MP is somewhat ok, 5 MP is the quality of my Casio camera (which has lasted a long time) and anything above that is great.
When you're looking for zoom, only look at the optical. Digital zoom distorts the image and most cameras let you change a setting so you don't even get the option to digital zoom. For taking pics of minis, zoom isn't actually important - but if you need a new camera, it's a nice added feature. (but will increase the price significantly)
If you're concerned about blurring your photos, buy a small cheap tripod and take your pics with the timer.
Be aware of your return period - Most stores offer one and this will allow you to try the camera out before deciding it's definitely for you. (Just remember to take it back while you still can if it isn't)
Lighting

You don't want to use the camera's flash because the intense light will ruin your colours. Light your model before taking the picture and turn off your flash.
Watch where you place your light. If you can setup a couple lights, all the better. The reason for this is to cut down on the shadows before your mini.
Read more about lighting here
Background
A plain white background is best but something simple also works:


A busy background should be avoided because it really detracts from the overall image: (hey, I can criticize myself)


A lot of people build a light box and there's plenty of tutorials out there on how to make one. Eg:
http://www.digital-photography-school.com/how-to-make-a-inexpensive-light-tent
Personally, I don't have the room for a box just to take pictures, so I use a few layers of white paper to create a clean background. This works surprisingly well. Since I set it up at my painting desk, I can use my lamp to light everything as well.
I like to paint on a raised surface, so I already have a few flat blocks of wood that can stand up to create a good sized area for photography.

I then cover each with a piece of white paper and to get a smooth transition I place another piece of paper that curves across the two.

When I did my WIPs for my Dungeoneer, I just covered my painting area with a piece of white paper. If you take a look at that tutorial, you'll see how something so simple worked out well.

I should note that there's actually different brightnesses of white paper. You'll want to get whatever's brightest. Places like Kinkos should sell you a few sheets so you don't have to buy a whole ream.
Taking the Picture
Cameras usually have variable levels of quality, so make sure you turn yours to the best. (That'll be the one that shows the least number of remaining photos) Stick with the normal zoom as macro is so fine the rest of your mini will often blur. (unless you want that effect)
- To ensure the best image possible, turn off the flash, digital zoom and anti-shake.
- If it's too dark with the flash off, adjust your lighting - don't enable the flash.
- If you're too shaky, get a tripod and use the timer.
- Hold your camera about a foot or two away from the mini then zoom in as far as you can while still being able to focus.
- Your camera can focus easier when it's physically away from it's target..
- Take AT LEAST two pictures. If you always follow this rule, you'll avoid getting blurry results. When doing WIP shots, this becomes very important as you can't go back and don't want to be checking your pictures after each shot.
- If you have problems with shaking / blurry photos
- Hold your camera between your finger and your thumb in the shape of a backwards "L" (if you're right handed). This creates a tripod effect.
- Use a mini tripod and the camera's timer.
- Take the photo after exhaling, before inhaling.
- Bonus photography tip: If you're taking a picture through glass, take the picture at an angle to get rid of glare.
Editing the Photo
 |
| Image from ShopnoRanga |
For the interest of this tutorial I'm going to demonstrate how to use Gimp. I do this, because it's FREE.
Open Source... embrace it...
(To be honest, my favorite photo editing software is actually Adobe Fireworks - I find it tons easier and faster than Photoshop for basic image manipulation)
(To be honest, my favorite photo editing software is actually Adobe Fireworks - I find it tons easier and faster than Photoshop for basic image manipulation)
The installer isn't complicated, just use the default settings and you'll be fine.
It'll place an icon on your desktop:
The standard interface will give you 3 windows on your desktop:


 Odds are, your photo is now really, really big. Choose different zoom amounts or hold [CTRL] and scroll your mouse wheel. Once you find the size you like, look at the bottom left of your image window - there should be a percentage there showing what zoom level you're currently at.
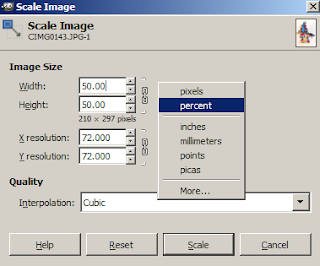
Goto: Image - Scale Image
You'll see the following window. Click the "Pixels" button and change it to "Percent". Now all you have to do is enter the new size and click "Scale".
As long as the chain icon to the left of "pixels/percent" is together, any adjustment to the Width or Height will affect the other equally.
You can also resize by pixel size if you know more precisely how big you want the image. As an example, if you click on the below image, the size it appears in your browser is 403 (width) x 276 (height).
 The "Image -> Transform" menu also has all the standard quick links for modifying your photo.
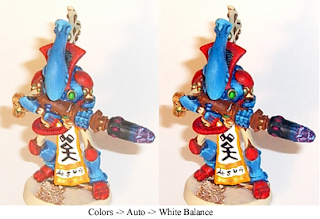 Another feature you may sometimes want to use is the Auto Adjust White Balance. If you colours look a little off, try this feature from: Colors - Auto - White Balance. All programs calculate this differently and Gimp isn't terrible at it. (Compared to professional ones)
(In Fireworks, this is +Filters - Adjust Color - Auto Levels)
You can do this manually in a similar way by adjusting the brightness and contrast.
Finally, it's just a File - Save As and you're done. Just remember that with GIMP, you need to type ".jpg" at the end of your files or it will save in it's own xps format.
For full documentation in multiple languages and tutorials, click here.
Editing Photos the Easy Way (Let Windows do it)
Not many of you may realize this, but Windows has a built in mass photo resizer. (I'm pretty sure Vista and 7 still have this feature) This won't crop the images for you, but it does resize their dimensions and file size to something more manageable.
So, if you don't want to bother with using full fledged photo editing software:

Signing your Photos
Before being completely done, a lot of artists like to sign their photos. Usually I'll tag them with my name, email, blog and/or Deviant Art page. Others will place an avatar that identifies them or a little logo on the image somewhere.
If you don't mind, overlap the bases a little or place it somewhere that would be obvious if a person of nefarious intent tries to rip off your art.
Distributing your Photos
There's plenty of free places out there to upload your photos to. Google offers up to 2 gb through Picasa, but you don't want to eat up room for your blog's photos. I recommend Deviant Art. Not only is it a gallery, but it's also a community. You can find groups of like minded users who collect and share images. People can also comment on your works and you can request critiques.
It'll place an icon on your desktop:
The standard interface will give you 3 windows on your desktop:

Open your file using either File - Open or just drag the file into the center window.
The first thing to do is crop the image. This means you cut out only the part of the image you want to keep.

Photo editing programs usually fit the image to your screen. You're going to want to see how big the image actually is. Goto: View - Zoom - 1:1 (100%)
 Odds are, your photo is now really, really big. Choose different zoom amounts or hold [CTRL] and scroll your mouse wheel. Once you find the size you like, look at the bottom left of your image window - there should be a percentage there showing what zoom level you're currently at.
Goto: Image - Scale Image
You'll see the following window. Click the "Pixels" button and change it to "Percent". Now all you have to do is enter the new size and click "Scale".
As long as the chain icon to the left of "pixels/percent" is together, any adjustment to the Width or Height will affect the other equally.
A reason to resize is that a blown up photo doesn't look as good. Keep in mind we're talking about miniatures that would only take up a small portion of your screen. Blown up detail like brush strokes and limitations of your camera will cause this "poster sized" image to degrade.
 |
 Another feature you may sometimes want to use is the Auto Adjust White Balance. If you colours look a little off, try this feature from: Colors - Auto - White Balance. All programs calculate this differently and Gimp isn't terrible at it. (Compared to professional ones)
(In Fireworks, this is +Filters - Adjust Color - Auto Levels)
You can do this manually in a similar way by adjusting the brightness and contrast.
For full documentation in multiple languages and tutorials, click here.
Editing Photos the Easy Way (Let Windows do it)
Not many of you may realize this, but Windows has a built in mass photo resizer. (I'm pretty sure Vista and 7 still have this feature) This won't crop the images for you, but it does resize their dimensions and file size to something more manageable.
So, if you don't want to bother with using full fledged photo editing software:
- Select a bunch of pictures
- Right-click on them
- Choose "Send To"
- Then choose "Mail Recipient"
- By default "Make all my pictures smaller" will be selected.
- Once they're converted, drag / copy them out of the email message into a folder on your computer.

Signing your Photos
Before being completely done, a lot of artists like to sign their photos. Usually I'll tag them with my name, email, blog and/or Deviant Art page. Others will place an avatar that identifies them or a little logo on the image somewhere.
If you don't mind, overlap the bases a little or place it somewhere that would be obvious if a person of nefarious intent tries to rip off your art.
Distributing your Photos
There's plenty of free places out there to upload your photos to. Google offers up to 2 gb through Picasa, but you don't want to eat up room for your blog's photos. I recommend Deviant Art. Not only is it a gallery, but it's also a community. You can find groups of like minded users who collect and share images. People can also comment on your works and you can request critiques.
Awesome post. I'm just starting to try to take good pictures of my painting and this will help a lot, especially the lighting as I think that's where I have the most problems.
ReplyDeleteI still need to write up a good post on lighting, but your best options are either natural light from a window (which isn't always reliable) or a neon light.
ReplyDeleteDon't get a standard desk lamp, look for a cylindrical or donut shaped neon one. The bulbs last for ages and the white lighting is tons better than normal "yellow" or "white-ish" screw in bulbs.
This is really a pretty great post - good work, mate.
ReplyDeleteAs to the light box, we once made one out a VB carton (beer) with two sides cut off as well as the top and use light blue paper; it worked pretty well. Also, as a tight git with space restrictions too, I found a good solution for a light box on my blog: http://thegoldend6.com/miscellaneous/easy-diy-light-box-2
ReplyDeleteThat's a nice solution - I'm glad to see there're plenty of great simple ways to put these together.
ReplyDelete