


Possible Problems
If you don’t keep your airbrush clean, there are all sorts of problems you can run into. Airbrush manuals will often talk about these problems, but here’s an overview.
- Thick Paint
- Fast Drying Paint
- Bubbling Reservoir or Seals
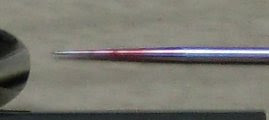
 |
| notice I'm blocking the nozzle with my finger |
Sometimes the bubbling will be coming out the sides of your various layers of nozzle parts.
This can also be due to poorly sealed (loose or dirty) or damaged nozzle and tip parts.
- Inconsistent Spraying
Supplies
So I'm in the process of testing out some of Blogger's monetizing features - bear with me and I hope this isn't tacky or annoying. That said, I had to dig around on eBay for some of these products, now the leg work is done for you.
- Airbrush Cleaner

Avoid Ammonia based cleaners, which can eat the metal.
Avoid Acetone (most nail polish remover) as it's a possible cancer agent as well as causing serious nervous system and organ damage through prolonged / often exposure via inhalation (breathing) and blood contact. (open wounds... like on a finger) Yeah, that's right - most nail polish remover isn't actually safe for removing nail polish.
I'll have to revisit this in the future and see if there are cheaper generic brands of cleaner - I'm thinking my Simple Green should work wonders.
- Q-Tips

- Syringe

- Cloth / Paper Towels

I use the blue shop towels you can find at hardware stores because they're much more absorbent and don't shred and come apart as easily as normal paper towels.
- Cleaning Brushes

- Lubricant

While you’ll use it super-sparingly, normal machine or 3-in-1 oils still aren’t recommended because they’ll break down your paints if any of the lube makes it's way to the front of the airbrush. (Which some will, since you lube the needle.) Apparently a brand called “Super Lube” is suggested, but I’m sure most hobby stores that carry airbrushes can suggest another brand. Generic brand “glycerin” lube from a drug store sounds like it usually does the trick, but may dry out sooner than airbrush lube. They come in different viscosities and the thinner, more water-like, ones seem to be too runny.
I found my bottle of Glycerine at a drug store in the same area as rubbing alcohol and iodine. The bottle says for dry and cracked hands, so you might find it with hand lotions and creams. Ingredients show “100% Glycerine”.
Not to be confused for “glycerine suppositories” in the laxatives section (which seems to trip up a lot of hobbyists looking for this stuff - and when I asked store staff for glycerine, they were only aware of the suppositories) or “other” lubes that drug stores sometimes carry.
I’ve read a few places that say oil can be used, but ONLY on parts that won’t come in contact with the paint or air. You’re better off avoiding oil if you can.
- Cleaning Pot

I can see one of these in my future, but I'm not rushing to get it.
Cleaning Paint
1. Repeatedly run water through the airbrush to get rid of as much colour as you can.

2. Use q-tips to rub off any extra paint from the reservoir. Usually a Q-Tip and some airbrush cleaner does the job.

When you clean off the paint, watch for flakes. You’ll want to remove these from the airbrush using q-tips or tweezers. (If you use tweezers, don’t scratch your airbrush)
If you run the airbrush with chunks of dried paint floating in the water, IT WILL clog your airbrush. Careful, because these dried pieces may have sunk to the bottom and be settled around your needle, just waiting to clog your tip.
3. Put airbrush cleaner in the reservoir, spray a little through, then let it soak briefly to eat at the paint before spraying it out.

4. Use q-tips again if you need to.
5. Repeat as necessary until there’s no colour left.
Airbrush cleaner can be expensive, so use water on most of the steps, and airbrush cleaner to finish it off.
If you're painting similar colours and/or shades, you don't need to clean it out as thoroughly. A little paint left will just blend the new colour a little closer to the previous one, which can be a nice thing.
Cleaning Clogs
1. You should always remove the needle first, so you don't damage it while removing the rest of the nozzle.
 Notice the needle will need some cleaning too.
If paint's dried enough to clog the nozzle, it's probably dried enough to stick to the needle.

Wipe from the body of the needle to the tip. You don't want to apply pressure and damage the fragile needle.
2. Take the nozzle section fully apart.
Use q-tips or brushes soaked in airbrush cleaner to remove paint from these parts. A little gentle force with the cleaner should be enough.

If you can’t disassemble everything, DON’T FORCE IT. Soak the parts that are stuck in your airbrush cleaner until the paint comes apart.
4. If need be, soak these parts in the cleaner for a while and / or repeat.
The inside of the airbrush can end up with caked or dried paint, flakes, and so on.

While a Q-Tip and some airbrush cleaner is usually enough, you can also break out the brushes for this too.
If you’re having trouble removing really caked on paint, try a stronger cleaner or use a rubber or plastic pick (like those dental picks) to scratch away the paint without scratching the chrome finish.
If you're using a stronger cleaner, don't go too strong. Ammonia based cleaners can damage your airbrush. Start with dish soap, Simple Green, Alcohol (Isopropyl, not Rubbing) etc.
Lubricating Parts
1. Remove the needle.
2, Place a few drops of lube behind the trigger.
 |
| I just used a tooth pick to get some from the bottle. Other lubes will come with a fine spout. |
3. Lubricate the needle – I’ve read a few different suggestions for how to do this:
 |
| Dip the first inch of the needle into the lube. If it’s too thick or too runny, wipe off the excess. OR |
 |
| Use a cloth to rub lube on the whole needle, then wipe it all off. A little will be left, which is all you need. |
4. Run the needle back into the airbrush and spray some air and a little water through the airbrush to get rid of any extra lube.
O-Rings
Airbrushes have rubber o-rings at certain places to create nicer seals.

Don lose these, because they trap the air inside your airbrush to create a proper pressure system. As they get old or dry-out, they can become brittle. You can find replacements at not only hobby stores, but also plumbing and hardware stores too. (Just be sure to get the right size and thickness replacements, which your airbrush manual should state)
[update] As commenter Asmodai points out, and part of the reason I keep suggesting you make sure you're using proper Airbrush Cleaners and not stronger solutions, is that many chemicals eat rubber. This will destroy your o-rings and you'll lose your seal. (First sign of a bad o-ring is usually cracking or ridging.)
Again, excellent article. It's making it very hard to to make the leap to getting one of these. Thank you.
ReplyDeleteFantastic article. I think I'll bookmark it for those 'something's not working' moments.
ReplyDeleteThanks muchly. I tell ya, before I got my thinning figured out, I was cleaning like 5 times a colour. Had these terrible images that I was going to have to go out and buy a whole new line of airbrush paints.
ReplyDeleteThis is an excellent series that's making me feel a little bit inadequate about our Adventures in Airbrushing series. =P
ReplyDeleteI'm planning on making a separate page dedicated to all the good airbrush knowledge I can find on the internet and I will definitely have to include these articles. Very informative and concise. I've got the first part down but tend to be a bit (read: much more than a bit) verbose and very thorough in my research so I think your articles and the one by The LeadHead would compliment ours quite nicely.
Thanks a lot.
ReplyDeleteYou've got some strong detail, but the problem with throwing a ton of product options at someone, it often overwhelms them. When I hunted around, so was I. Still useful though because I still researched after the local guy suggested options. (ynever know if the sales people know what they're talking about or are trying to screw you for a sale.)
As for my detail.... Also thanks :-) I try to cover all facets of things.
Those two O-Rings towards the end are great examples of why you should use airbrush cleaner and not other solvents. If you use other solvents they may end up destroying the O-Rings. I know you might able to replace them at the local hardware store, but it would be easier to avoid all that by just using the recommended cleaners.
ReplyDeleteLoving the article, by the way!
Thanks Asmodai! I've updated the o-ring section as I left out that bit. I keep suggesting people use recommended airbrush cleaners and this is exactly one of the reasons.
ReplyDelete@ Dave - Useful resource that I'll be coming back to once I get an airbrush. Regarding acetone being carcinogenic. Where did you get that information from?
ReplyDeleteDo a Google for "MSDS Acetone". MSDS is a standard of Material Safety Data Sheets. (eg: http://www.sciencelab.com/msds.php?msdsId=9927062 )
ReplyDeleteThe thing about Acetone's MSDS sheets is they often don't agree with each other, and it's supposed to be a standard. Lots of "possibles", not many for sures. It's one of those chemicals used in every day life, and there haven't been enough studies on it's (possible) carcinogenic effects.. There are plenty of other horrible side effects, defatting of skin, and organ damage, which get worse with more exposure. It's a substance that's questionable enough that certain ISO industry standards have banned it from use.
In other areas, things like BPA (plastics) are starting to be classified as toxic as research is finally being done.
I think the Data Sheets are influenced by the state and country policy. As well as the level of exposure in the industry. At increased levels it becomes dangerous (such as damage to central nervous system and some organs).
ReplyDeleteThe reason I was asking is because we use it in the hospital to remove nail polish and artificial nails. And according to one of my textbooks it is used to clean the skin prior to injections... never seen that done before as we use alcohol wipes.
Acetone is also found in small amounts of normal urine. When during a urine analysis it is called a ketone. Fun fact.
Acetone is even a chemical found in nature, not a synthetic one. MSDS sheets tend to be federally regulated I believe, but will differ from country to country. (Though certain ones will be from the manufacturer of something, which will be reused)
ReplyDeleteThe question of cancer causing aside, the nervous system and organ damage is also concerning to me. Inhalation / wounds seem to be the most common method of contamination, and lets face it, we often have little cuts around our fingers / nails, and some people have jobs that'll have them breathing that stuff often. (spas, salons... hospitals, etc..)
It's a societal thing though... you use it because it's really good at removing polish / nails and it's an accepted product in the beauty industry... and beauty tends to win over health. Some brands are slowly (and silently) moving to non-acetone products, but don't want to hype it up. ("Why are we changing? Uh, no reason...") But you still need hard chemicals to remove strong nail polish... and who wants chipped paint, nomatter how harsh of chemicals you're pouring on your nails daily/weekly?
Buuuuuuuut, how's this affect us hobbyists? In the end, I look at it as a matter where you have a choice between perfectly safe cleaning products (we're working with water-based stuff after all) so why not go that route?
Though your point is noted, that my description of acetone could use some rewording, and I've fixed that.. possible cancer agent / serious organ/nervous system damage over prolonged exposure.