


 As promised, the following is a tutorial on dry-brushing. Through this, you're able to apply colour to raised areas like symbols, runes, designs and patterns or to edges and such. By using this method, it basically ensures that you won't get any paint on the lower areas. Typically this is to add highlighting of one form or another, but can also be used to do some rough blending.
This is a technique for both beginners and experts alike. For the new artist, you can apply highlights to a large area relatively quickly - no matter how fine or detailed that area is. Of all the techniques a new artist can learn, this is one of the best. For the advanced artist, dry brushing allows controlled and/or subtle highlighting in smaller areas.

 The first thing to learn about dry brushing is the correct amount of paint to use.
It's actually impossible to dip your brush into your paint and come back with the right amount of paint. When you dry brush, you don't actually want any paint on your brush. (as far as you can tell)


 You probably already have a cloth that you use to wipe your brush on when you clean it. Get some paint on your brush and wipe it all off on the cloth. All of it.
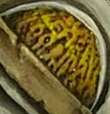
 Something you have to watch is that your brush isn't damp at all. If you have water on your brush when you try to dry brush, it'll thin and run into the cracks you're trying to avoid. The picture to the left shows what it might look like if your brush is wet when you wipe the paint off.
This is why it's handy to have a bunch of spare brushes. Otherwise, you'll have to let your brush dry in between colours.
Side note: Give you some ideas on how to blend?

 So, I'm going to use a little grey paint, wiping off as much as I can, then I'm going to recreate the light you can already see reflecting off the paint.
You don't always use white or grey to highlight, but a whiter version of your colours is better than a brighter colour. (For example, highlight blue with a blue/white mix instead of a bright ice/lightning blue)
Once you've wiped most of the paint off of your brush, you need to apply it to the model.
Flick the brush back and forth rapidly across the area you want to dry brush. Think of a super fast metronome. Only the tips of the bristles should come into contact with the object. It's going to take a whole bunch of passes before you get the colour as intense as you want it. Just keep flicking the bristles over the area you're highlighting until things look how you want them. Depending on the size of the area, you may have to refresh the paint on your brush a few times.
This is similar to the technique I demonstrate in my tutorial on creating blood splatters.

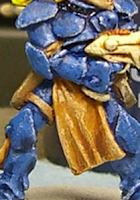
Victim 2's the lucky one, just the edges of his hair has been highlighted.

Again, to avoid this, either allow your brush time to dry between uses or keep a bunch of extra brushes on hand.

Instead, work up the area, starting with a thicker area and use a dry brush to blend to the rest of the area.

In the center photo, things look a little "chalky" and there's some streaking in the solid paint areas.
The streaking is from using a thick foundation paint to dry brush - thinner colours spread easier. (But I wanted a paint that would stand out better for this tutorial)
The chalkyness is something you get sometimes from dry brushing, usually also if the paint is a little heavy.
Sometimes, especially if dry brushing a large area, applying a thin wash over top will blend the dry brush layer into the previous one. It also removes any chalkyness you might have. (3rd pic)
Something to be aware of when dry brushing, is that it's also messy. Unless you're being very controlling and careful, there'll be a lot of "overbrush". This means you won't be painting "in the lines". You can touch up the areas you get the extra paint on, but you're better off just painting the areas you need to dry brush first, then the areas around them after. Take a look at the photo below for an example:

Great job on these tutorials. I really like that you incorporated the common mistakes with clear examples.
ReplyDeleteDitto on Thor's comment. Providing examples of the most common errors for beginners is EXTREMELY helpful.
ReplyDeleteMy complements on your blog. It's very informative and I read it religiously.