


 |
| XKCD |
First off, you need to know a few things about actually buying the airbrush. While I won't suggest specific brands, (because I won't promote products I haven't used) these tips should help you find something that works for you.
In addition, read my outline in a previous post entitled "Shop Smart"
- New vs Used
However, airbrushes are expensive. It’s a big investment to get setup and have the features you want. For example, if you can’t afford to spend the money on a dual-action airbrush, you’re probably going to be in for a mediocre experience with a single-action one. A used model will at least give you an idea of whether you want to invest in a new one.
This becomes a question of cost… $50 for a used airbrush that has who knows what’s wrong with it and probably needs to be cleaned, could instead be $50 toward a good quality one for $150-200. If you see a deal on Kijiji, eBay or at a garage sale for $20 or so, then there’s no harm to picking it up, playing around, and having a spare if you decide to buy yourself a good one.
I’ve tried picking up an extra cheap old one from nail salons, but have had strong difficulty with language barriers and the impression that they just toss old ones into the garbage. I found one decent looking one and the owner destroyed the nozzle by trying to remove it with force when it was stuck with dried paint.
"I just need to take this off."
"Nono, that's ok, it looks fine, just needs cleaning. I'll take it."
*snaps the tip of the nozzle off*
“Oh, it’s already broken.”
O.o
Which leads to another point - if you're buying a used airbrush, make sure it's whole. A few bucks here for a new nozzle, a few more for a new needle, etc, add up quickly to turn a $50 airbrush into $70+ and the money spent could have gone towards a new airbrush.
The benefit to searching around at local (or local-ish) hobby and art stores is that you can talk to staff who are (theoretically) familiar with their products. This means if you have any difficulty down the road, you can probably bring your airbrush to the store and ask further questions, get tips and source supplies.
- Local vs Online
The benefit to searching around at local (or local-ish) hobby and art stores is that you can talk to staff who are (theoretically) familiar with their products. This means if you have any difficulty down the road, you can probably bring your airbrush to the store and ask further questions, get tips and source supplies.
If you don't see any, don't forget to ask staff. It's expensive for a store to stock items that don't sell too often so there might be a catalog you can order from.
- Try One Out
- Price
The features you're interested in will determine the price. A mid-range airbrush is a good place to start. Est prices listed in CAN / USD. These prices are just a rough guide - they'll vary quite a bit by brand, region, online vs store front, etc.
- Low End
- Typically, a lower end airbrush will be about $50-100 and tend to be single-action, bottom feed models. These are often sold as kits and might come with a few jars and a cheap hose.
- Their pricing might go up to $150 or so for kits with some extra equipment, but still single-action, bottom feed.
- Mid Range
- A decent dual-action, gravity fed airbrush could run you about $100-200 online, or $150-250 in store, hoses and other accessories separate. (Mine was around $200)
- Higher End
- An airbrush with a very fine nozzle / needle and lots of extra features (such as built in mac valves and larger reservoirs) will run you hundreds of dollars. Aside from a smaller nozzle / needle, most of these other options aren't necessary for a new airbrusher.
- Kits
- You can often get kits for the mid-high end airbrushes too. They'll come with the airbrush, a compressor, a hose and perhaps some cleaning supplies or mixing jars and such.
- Pricing will vary greatly on these kits, so do a little research before investing. A kit should be roughly the cost of all the items in it, usually with a bit of a discount.
- A plus side is it's everything you need, all in one place. No hunting around.
- On the down side, they don't tend to include air tanks... which I'll talk about later with sourcing compressors.
Features
Single action means that all you do is press on the trigger and both air and paint come out; the harder you press, the stronger the flow of both. This works for basic things like covering a large area quickly – priming, washing, large terrain boards, etc. Not great if you need the control to do detail. Sometimes you can adjust the needle manually, between uses, to adjust flow, but not easily/cleanly on the fly.
 A dual action trigger means that the trigger moves in two directions. Pressing on it will allow you to control how much air flows through. (The force or pressure of the air, up to whatever your compressor is set to) While controlling the air flow, you then pull back on the trigger (which pulls the needle back) to control the amount of paint to be mixed into the stream. This gives you a far superior control over how much paint and how strongly it sprays out.
- Single vs Dual (Double) Action
 |

Dual action is a must if you're looking to do more than just overall basing and serious about airbrushing.
*note, it’s sometimes normal for a trigger to not fully spring back or feel jerky or rough when an airbrush isn’t under pressure. If you’re looking to buy one, don’t think this is a sign that it’s broken. I've noticed this with some other air-powered tools as well.
*note, it’s sometimes normal for a trigger to not fully spring back or feel jerky or rough when an airbrush isn’t under pressure. If you’re looking to buy one, don’t think this is a sign that it’s broken. I've noticed this with some other air-powered tools as well.
- Nozzle / Needle Size

- 0.55mm is too large unless you're just basing.
- While I haven't tried one, I can't see myself using a nozzle larger than my current 0.35mm.
- 0.35mm I'm finding is a nice overall size.
- It allows me to adjust what I need to using air / paint flow and distance from the object.
- 0.2mm is for finer detail
- I can see myself getting one of these in the future, though currently I can get smaller lines by moving my 0.35mm airbrush closer to the object.
It’s useful if your airbrush has the option to remove the nozzle and swap it with one of a different size, but I recommend getting a mid-sized one to start. Then if you find you want a finer or larger spray later, you can change. (This will have an impact on how fine the detail you can paint)
- Paint Feed Location

These are the cheapest models you’ll see, and are only good for painting large areas like game boards, priming, washing and so on.
That said, if you plan on doing a lot of terrain work, basing large areas, washing armies in one fell swoop, priming your troops with gesso (if you live in a climate that prevents using normal primers) then this will give you the bulk workload you need.
Some airbrushes have the option of sticking one of these jars upside down into its feed as well.
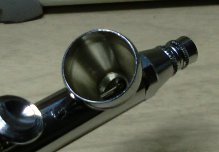
My reasoning for getting the smaller one was to keep the airbrush as light as possible and avoid it being front heavy. I can tell it will be too small if I have to paint a large area, (terrain, some vehicles or a titan) but after creating my Postapocalyptibuggy, it’ll be fine for dreadnought or most vehicle sizes and smaller. The only thing to be careful with in a top hopper is you don’t fill it too full, and watch for spilling. (Sometimes you can find models that have screw on lids)


- Mixing Point
To get a better quality mix of paint and air, you want to find airbrushes that do an “internal mix”. This creates a finer mist when the air and paint mix together inside the airbrush. If paint and air mix together outside the airbrush, this is an “external mix” which creates a rougher, sometimes speckled appearance. (Not useful for anything but painting large areas)
Most of the above styles of airbrush are internal mix, with the jar styles being external mix.
- Pressure
 |
| 15 psi, very low pressure and causes more of a stippling (dotted) look. On the plus side, lots of overlap |
 |
| 60 psi, higher pressure, more filled in, cleaner edges, but less blending/overlap. (though as you can see, still some |
- Tubing
Ever fight with a tangled mouse cable while using your computer? Imagine that connected to a brush. They don't make wireless airbrushes, so buy a nice hose.

Hoses also have a pressure rating for them, which should be fine for most hobby reasons. If you're planning on using higher end attachments for a compressor, (staple guns, rotary tools, etc) then you'll need a tube for your compressor with a high pressure (PSI) rating, and a thinner flexible one for your airbrush that will be rated lower. A hose should also generally be rated HIGHER than you'll be using it at - for example, my compressor goes up to 150psi and the hose is clearly marked as being good up to 200psi. (This prevents stress on equipment and fittings)
If you get an extra long hose, you may have to turn the pressure up since you lose some over distance. (For example, a compressor setup in a basement or a garage with tubing run to your hobby room.) More on this later, when I talk about compressors and valves.
- (lack of) Tool Requirement
Just because something is rated "hand tightened" doesn't mean you should use all force humanly possible. Tighten it, but don't force it.
Optional Supplies
These aren’t things you need right away, but can make your life easier and modify how your airbrush works.
- Quick Release valve

If you're using multiple tools, this is really handy. Otherwise, not a critical part to save the 10 seconds it takes to screw an airbrush on at the beginning and end of a painting session. Every quick-join is also a possible failure point for air to leak out. I'd probably buy one to try out if the price was right and wasn't going out of my way to get it.
- Holders

(or dragged behind your compressor up concrete steps getting the finish shredded when your landlord has to rush to empty your flooded apartment.... yeahhhh...)
Either way, I suggest finding somewhere to store the airbrush, not connected to your compressor, when you're not using it. This allows you to wrap tubes up and get things out of the way.
- External Mac Valve

Some people will leave their compressor turned up higher than they need, using the Mac at around the half-way point. They can close the valve to stipple or open it to get more pressure for cleaning to switch paint. The problem is, you don't know what pressure you're actually working at, so it's more for someone who has a "feel" for pressure that comes with experience.
- Water / Dust Trap

You can get these for both your airbrush and/or your compressor. (more on that when I look at compressors)
The theory is that they work the best as close to your airbrush, but once again I prefer to avoid anything that would weight down my airbrush. I mean, really... look at the size of that thing. I want an airbrush that's light. For this reason I'm skipping an airbrush dust trap, and purchased one for my tank.
I didn't notice any moisture / dust problems without the trap at all, which is why I don't mind just putting it on the compressor.
- Handles

Before waving this off as unnecessary, I'll point out a few things...
- For marathon painting sessions, this could be easier on your muscles.
- Some people (longer, larger, shorter or smaller hands and/or fingers) find the top-mount trigger awkward.
- People with physical disabilities probably would find this much easier.
* Anyone remember those stationary mice where you rotate a ball, instead of moving the mouse? They were excellent for older people with muscle problems and people with physical disabilities. Lots of people are upset now that you can barely even find them.
- Valves, Gauges and Regulators

Basically, these allow you to split the air feed to multiple work areas either for use one at a time, or to be all used at the same time. Each can be set at a different pressure.
Read Instructions
Airbrushing isn’t complicated, but there are some important things to be aware and keep track of. Don’t take my word for law and READ THE INSTRUCTIONS. Things will vary from product to product and you’ll want to know all the specifics of your own brand and model of airbrush.
Numerous images in this post from Iwata's product site.
 Take a look at the Wargaming Tradecraft Techniques Page for links to the entire Airbrushing series and other tips, tutorials and information.
Truely an excellent series and very informative. Also it is nice that you go into such detail. It does seems like you have put in a lot of time, effort and research into it ( including going to nail bars - research purposes only of course! :) ) Much appreciated and looking forward to the following articles.
ReplyDeleteGreat advice. Could have done with this when I decided to buy earlier this year.
ReplyDelete